

Table of Contents
- Choosing the Right Bollard for Your Site
- Bollard Installation Tools and Materials You Will Need
- In-Ground Bollard Installation Depth and Concrete Setting
- Surface Mounted Bollard Installation on Concrete and Tarmac
- Fitting Removable and Retractable Bollards
- Common Bollard Installation Mistakes to Avoid
- Frequently Asked Questions
Last Updated: September 19, 2026
Choosing the Right Bollard for Your Site
Learning how to install different types of bollards starts with picking the right one. Bollards are short, sturdy posts that protect vehicles, premises and pedestrians from impact damage. At Store Fittings Direct, we've spent over 30 years supplying site protection products, so we've seen which options hold up and which ones don't.
Here's the honest breakdown:
- In-ground bollards suit permanent protection on forecourts and car parks
- Surface mounted bollards work when you can't dig up the ground
- Removable bollards give occasional access without permanent obstruction
- Retractable bollards offer the best of both: security when up, clear access when down
The type you choose decides the whole installation. Get it wrong and you'll be redoing the job within a year.
According to the Health and Safety Executive's guidance on workplace traffic routes, separating vehicles from pedestrians is a core duty for any site manager. Bollards are one of the simplest ways to do it.
Bollard Installation Tools and Materials You Will Need
The right bollard installation tools turn a two-day job into a half-day one. Gather everything before you start, because a half-dug hole and a missing level are a recipe for a wonky post.
For in-ground installation:
- Post hole digger or auger
- Spade and shovel
- Wheelbarrow and mixing tub
- Postcrete or ready-mix concrete
- Spirit level (600mm minimum)
- Tape measure
- String line and pegs
For surface mounted installation:
- SDS hammer drill with masonry bits
- Vacuum or brush for clearing dust
- Torque wrench
- Anchor bolts or resin fixings
- Socket set
For removable and retractable posts:
- Ground sleeve (usually supplied)
- Drainage gravel
- Silicone sealant
- Grease for the locking mechanism
In-Ground Bollard Installation Depth and Concrete Setting
The correct in-ground bollard installation depth is one-third of the total bollard length below ground. A 1,000mm post above ground needs roughly 300mm to 400mm buried, set in concrete.
Here's the process:
Lift Assisted Telescopic Retractable →
- Mark your positions with string line and pegs
- Dig each hole to the required depth, plus 100mm for a gravel base
- Add 100mm of gravel for drainage
- Stand the bollard in the hole and check it's plumb
- Pour concrete around the base, working it in to remove air pockets
- Re-check the level and brace the post until the concrete cures
- Leave for at least 24 hours before use
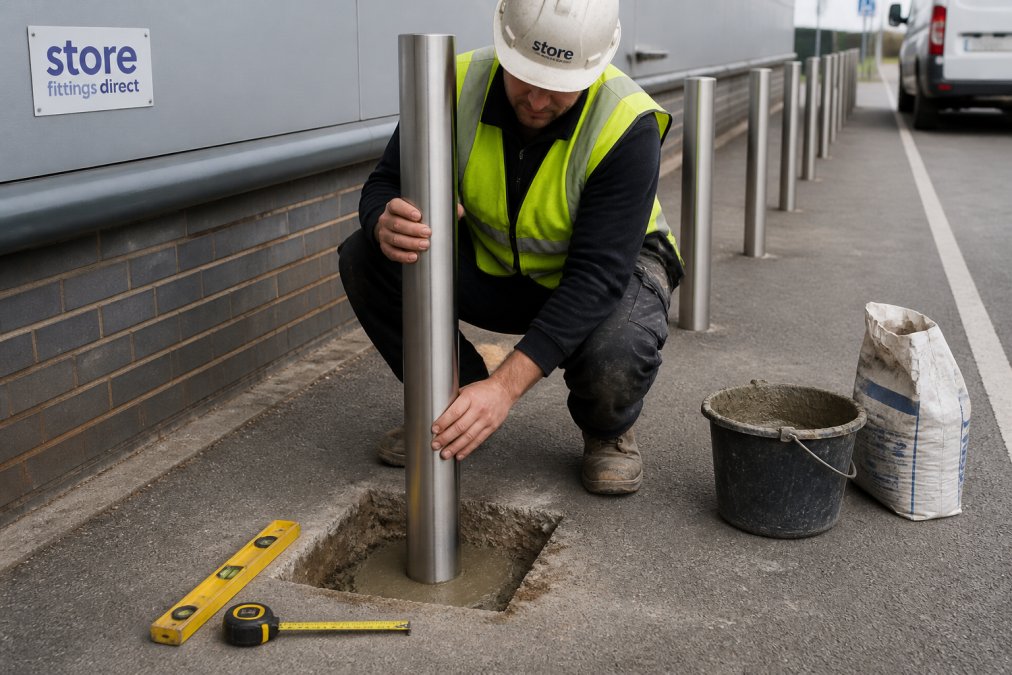
Spacing matters as much as depth. Leave 1,200mm to 1,500mm between posts so pedestrians and wheelchairs can pass, but vehicles can't.
Surface Mounted Bollard Installation on Concrete and Tarmac
Surface mounted bollard installation is the fastest route to protection when digging isn't practical. The post bolts straight onto the existing surface using anchor bolts or resin fixings.
The method changes with the surface:
Surface |
Fixing Method |
Notes |
|---|---|---|
Concrete (100mm+) |
Sleeve anchors |
Strongest option |
Tarmac |
Resin anchors |
Needs solid base beneath |
Block paving |
Resin or long anchors |
May need base reinforcement |
Drill the holes to the exact diameter of your fixings, then clear every trace of dust. Dust is the single biggest cause of loose anchors.
For a removable post like the Stainless Steel Removable Bollard 304 Grade, you'll set the ground socket flush with the surface first, then bolt or concrete it in place.

Fitting Removable and Retractable Bollards
Removable and retractable bollards need a ground sleeve, not a concrete surround. The sleeve holds the post and lets you lift it out or lower it when access is needed.
Removable bollards use a tab and padlock system. You lift the post out entirely when you need access.
Retractable bollards stay in place and drop below ground. The Lift Assisted Telescopic Retractable Bollard uses a gas spring to lower the post gently, so there's no heavy lifting. It's tested and approved by Sold Secure and holds Secured by Design status.

For forecourts with regular deliveries, the Semi-Automatic Drop Down Security Post reclines with a gentle push and rises again with a foot pedal.

Installation steps:
- Dig the sleeve hole to the supplier's specified depth
- Add 100mm of gravel for drainage
- Set the sleeve flush with the finished surface
- Check the sleeve is plumb in both directions
- Concrete the sleeve in and leave to cure
- Fit the lid, then test the post operation
Common Bollard Installation Mistakes to Avoid
Most bollard failures trace back to the same handful of errors. A common mistake is digging too shallow a hole and hoping the concrete makes up for it. It won't. The post will lean the first time a vehicle nudges it.
Lift Assisted Telescopic Retractable →
Other frequent problems:
- Skipping the drainage layer, which traps water and rusts the post from the base up
- Over-tightening anchor bolts, which cracks the concrete and weakens the fixing
- Ignoring spacing, which either blocks legitimate access or lets vehicles through
- Not checking for buried services before digging, which is both dangerous and expensive
Before any dig, check for underground cables and pipes. The Health and Safety Executive's guidance on safe digging sets out what you need to do.
Our customer feedback backs this up. One client told us: "Top class customer service and very helpful. Assisted us in improving on delivery time for an important item required for project completion."
Bollard installation is straightforward when you match the post to the ground and follow the depth and spacing rules. The mistakes come from rushing the prep, not the fitting.
Store Fittings Direct supplies a full range of bollards built for forecourts, car parks and pedestrian areas, backed by over 30 years of experience and more than 1.3 million products sold. Our Price Match Promise and trade accounts with 30 days interest-free credit make bulk orders simple, and we deliver nationwide.
Get started with Store Fittings Direct and protect your site with bollards that last. View details on our full bollard range today.
Frequently Asked Questions
What are the different methods for installing bollards?
There are three main methods. In-ground bollard installation sets the post in a concrete footing below the surface, which gives the strongest hold. Surface mounted bollard installation bolts a base plate directly onto sound concrete or tarmac, which suits solid existing surfaces. Removable and retractable posts either drop into a ground socket or a below-ground sleeve, so they can be taken out or lowered when access is needed. The right choice depends on your surface, the level of impact protection required and how often you need to open the area to vehicles.
How deep should an in-ground bollard be buried?
A common rule is to bury roughly one third of the post's total length. A bollard standing 900mm above ground therefore needs a footing of around 300mm, giving a hole about 600mm deep. The hole should be around twice the post diameter and filled with concrete to at least 100mm above the base. Deeper footings are needed on soft ground, near kerbs or where vehicles may strike at speed. Always follow the manufacturer's stated depth for the model you buy.
What tools are required for professional bollard installation?
For bollard installation tools, gather a post hole digger or auger, a spade, a wheelbarrow and mixing tub for concrete, a spirit level, a tape measure, a lump hammer, a torque wrench or socket set for base plate bolts, and an SDS drill with a masonry bit for surface mounting. You will also want safety gloves, goggles and high-visibility clothing. For retractable posts, add the supplied key and a small brush for clearing grit from the ground sleeve.
Do I need planning permission to install bollards on my property?
In most cases, bollards on private land are permitted development and do not need planning permission. However, if your property is listed, sits in a conservation area, or the bollards sit on or near a public highway, you should check with your local planning authority first. Bollards over a certain height near a road may also need consent. It is worth a quick call to your council before you dig, especially for forecourt or pavement installations where highway rules apply.


