

Table of Contents
- What You'll Need Before Starting
- Gondola Shelving Installation Tools: Essential Equipment
- Step 1: Prepare Your Space and Check the Floor
- Step 2: Gondola Shelving Assembly Instructions for the Frame
- Step 3: Single-Sided Gondola Shelving Installation
- Step 4: Double-Sided Gondola Shelving Installation
- Common Mistakes to Avoid
- Frequently Asked Questions
Last Updated: October 14, 2026
What You'll Need Before Starting
To install gondola shelving correctly requires careful planning and the right preparation. Success always starts before you pick up a single tool.

The most common mistake is rushing straight to assembly. You need to measure your space, check the floor, and gather everything you'll need. This takes time, but it saves headaches later.
Start by reviewing your space. Gondola shelving sits free-standing on the shop floor, so your foundation matters. Uneven floors cause wobbly units. Dust and debris create assembly problems. Take an hour to prepare properly.
Gondola Shelving Installation Tools: Essential Equipment
You'll need specific tools to install gondola shelving units properly. Missing even one can slow you down or compromise the final result.
Essential tools you must have:
- Rubber mallet (for tapping frame components into place)
- Spirit level (to check vertical alignment)
- Adjustable spanner (for tightening bolts and brackets)
- Socket set (for securing frame connections)
- Screwdriver set (Phillips and flat-head)
- Tape measure (at least 5 metres)
- Pencil (for marking positions)
Optional but helpful:
- Power drill (speeds up bracket installation)
- Work gloves (protects hands during assembly)
- Cardboard or protective mat (keeps shelves clean during assembly)
Modern gondola shelving units use standardised bolt systems. Your spanner and socket set need to fit these bolts. Check your unit's assembly guide for the exact sizes before you start.
The spirit level is non-negotiable. A shelf that looks straight to the eye might actually lean. Customers notice wobbling units. They lose confidence in your products.
Step 1: Prepare Your Space and Check the Floor
Before installing gondola shelving units, prepare the area where they'll stand. This step determines whether your shelves stay stable or develop problems within weeks.
Check your floor first:
- Walk the area and feel for dips or high spots
- Use a long straight edge (like a 2-metre level) to identify uneven sections
- Mark any problem areas with tape
- Measure the height difference across the space
Most shop floors aren't perfectly level. That's normal. What matters is knowing where the high and low spots are. Gondola shelving units adjust with levelling feet, but only within limits. If your floor dips more than 25mm across the unit's width, you'll need to shim or reposition the unit.
Prepare the installation area:
- Clear the space completely (no boxes, stock, or debris)
- Sweep and mop the floor to remove dust
- Let the floor dry completely
- Mark the exact position of each unit with tape or chalk
Dust under the feet of a gondola shelving unit causes rocking. It also makes levelling impossible. A clean floor takes 20 minutes and prevents hours of frustration later.
Step 2: Gondola Shelving Assembly Instructions for the Frame
The frame is the skeleton of your gondola shelving installation. Get this right, and the rest falls into place.
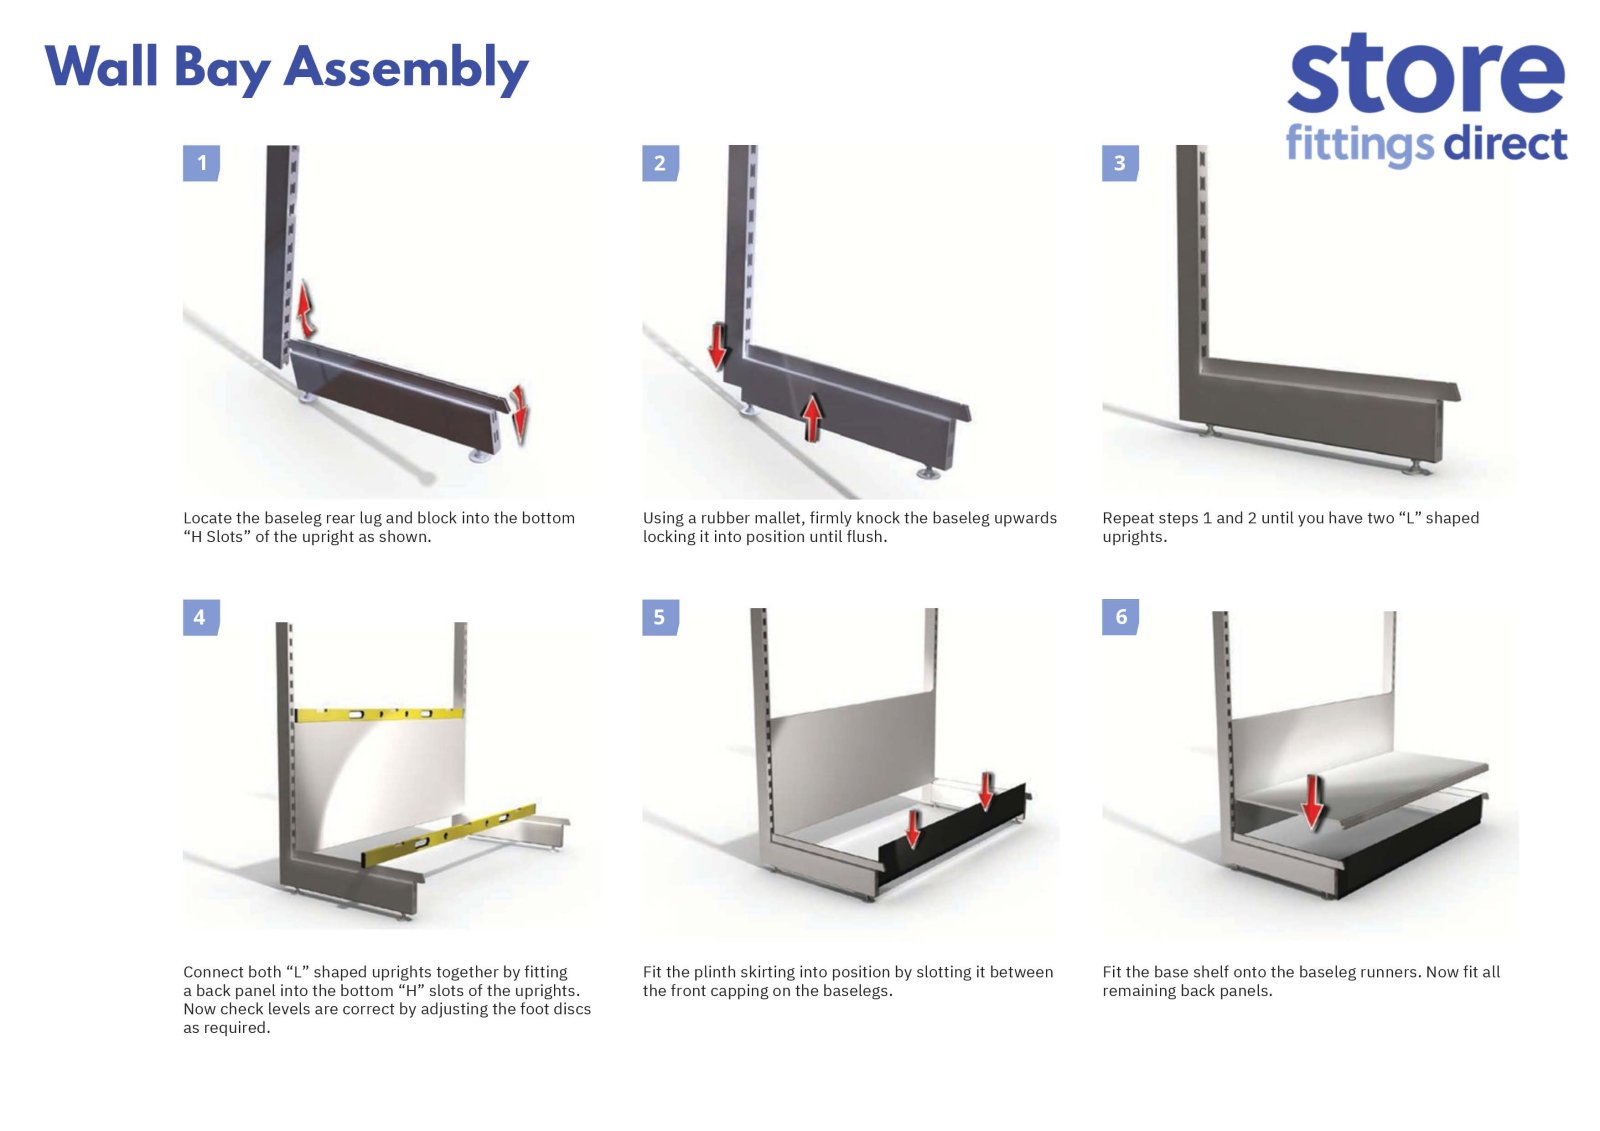
Lay out all frame parts before you start:
- Uprights (the vertical posts)
- Base rails (bottom horizontal supports)
- Top rails (upper horizontal supports)
- Brackets (corner and mid-point connectors)
- All bolts, washers, and nuts
Check against your assembly guide. Missing parts mean delays. Identify them now, not halfway through.
Wood Effect Gondola Shelving Bay | 1.4m High × 300mm Base Shelf →
Connect the base rails to the uprights:
- Position the first upright on the floor
- Slide the base rail into the slot on the upright
- Insert bolts through the bracket holes
- Hand-tighten the bolts (don't fully tighten yet)
- Repeat for the second upright and opposite base rail
This creates a rectangular frame. Don't fully tighten anything yet. You need flexibility for alignment.
Attach the top rails:
- Position the top rails at the correct height (your assembly guide specifies this)
- Slide them into the upright slots
- Insert bolts and hand-tighten
- Check that the frame is square by measuring diagonals (they should be equal)
Fully tighten all bolts:
- Use your spanner to tighten each bolt firmly
- Work in a cross pattern (opposite corners, then sides) to keep pressure even
- Don't over-tighten; you'll strip the threads
The frame should feel rigid when you push on it. If it flexes, tighten the bolts more.
Step 3: Single-Sided Gondola Shelving Installation
Single-sided gondola shelving units face one direction. They're ideal for wall placement or end-of-aisle displays.
Position the frame against the wall:
- Move the assembled frame into position
- Place it 150mm from the wall (this allows space for dust and cleaning)
- Use your spirit level to check it's vertical
- Adjust the levelling feet until the frame is perfectly level
The levelling feet are adjustable screws at the base of each upright. Turn them clockwise to raise the unit, anticlockwise to lower it. Adjust one foot at a time, checking with the level after each adjustment.
Install the base shelf:
- Slide the base shelf into the slots on both uprights
- It should sit flush with no gaps
- The shelf supports the most weight, so make sure it's fully seated
Add the upper shelves:
- Install shelves from bottom to top
- Space them according to your product height requirements
- Most units allow 50mm adjustments (you can move shelves up or down in 50mm increments)
- Ensure each shelf is level before moving to the next
Secure the unit to the wall:
- Use wall anchors rated for your shelf load
- Attach brackets from the back of the unit to the wall
- This prevents tipping if customers lean on the shelves
Single-sided units are lighter than double-sided, but they still need wall support. Never skip this step.
Step 4: Double-Sided Gondola Shelving Installation
Double-sided gondola shelving units display products on both sides. They're perfect for shop floor placement and require more careful levelling.
Position the frame in the centre of your space:
- Measure from walls to find the exact centre position
- Mark this position with tape
- Move the frame into place
- Check that it's level in all directions (front-to-back and side-to-side)
Double-sided units are heavier and more prone to tipping. They must be perfectly level. Use your spirit level on both axes.
Install shelves on both sides:
- Start with the base shelf on one side
- Slide it fully into the slots
- Move to the opposite side and install the matching base shelf
- Alternate sides as you move up
Installing both sides evenly prevents the frame from tilting. If you fill one side completely before starting the other, the weight imbalance can shift the frame.
Wood Effect Gondola Shelving Bay | 1.4m High × 300mm Base Shelf →
Check stability at each stage:
- After installing every second shelf, push firmly on the unit
- It should not rock or flex
- If it does, stop and check your levelling feet
- Adjust until the frame is solid
Secure the unit:
- Double-sided units don't need wall anchors (they're free-standing)
- But they should be positioned away from high-traffic areas
- Never place them directly in a doorway or narrow aisle
- Leave at least 1 metre of clear space on both sides for customer access
Common Mistakes to Avoid
Most installation problems stem from a few predictable errors. Knowing these saves time and prevents damage.
Skipping the floor check: Uneven floors are the number-one cause of wobbling shelves. You can't level a unit on a bumpy floor. Spend time preparing the floor properly.
Rushing the frame assembly: Bolts that aren't fully tightened loosen further as the unit settles. This creates creaks and movement. Tighten everything firmly before installing shelves.
Ignoring the spirit level: A shelf that looks level often isn't. Use the spirit level on every shelf, not just the first one. Small angles compound as you add more shelves.
Installing too many shelves: More shelves mean more weight. Overloading a unit causes sagging and instability. Check the weight rating in your assembly guide and respect it.
Placing shelves too close together: Shelves that are too close waste space and make it hard to stock products. Use the adjustable slots to space shelves properly for your products. Most retailers find that appropriate spacing works well for general merchandise.
Forgetting to secure single-sided units: A single-sided unit leaning against a wall isn't secured. It can tip if customers push on it. Always use wall anchors.
Mixing different unit types: Gondola shelving units from different manufacturers use different bolt sizes and slot patterns. Don't try to connect units from different suppliers. It won't work properly.
Installing gondola shelving units correctly transforms your retail space. A stable, level display looks professional and encourages customers to browse. The process takes patience, but it's straightforward if you follow these steps.
Store Fittings Direct offers a range of gondola shelving options, including the Wood Effect Gondola Shelving Bay, which combines durable steel frames with realistic wood finishes. Starting from £143.55, these units come with nationwide delivery and are designed for easy assembly. Get started with Store Fittings Direct and create retail displays that boost customer engagement and sales.
Frequently Asked Questions
What tools do you need to install gondola shelving?
You'll need a spirit level, tape measure, adjustable spanner, socket set, rubber mallet, and a power drill. A stepladder is essential for reaching upper shelves safely. Having a helper speeds up the process significantly, though one person can manage with careful planning. Ensure your tools are in good condition before starting installation.
How do you assemble a gondola shelving unit?
Start by laying out all components and checking against the parts list. Attach the uprights to the base frame using the provided bolts and brackets, tightening firmly but not over-tightening. Install shelf supports on the uprights at your desired heights, then slide shelves into place. Use a spirit level throughout to ensure everything is square and level before fully tightening all connections.
Can one person install gondola shelving?
Yes, but it's considerably more challenging. A single person should take extra time to support the frame properly during assembly and use temporary bracing to prevent tipping. Having a second person makes the job faster and safer, particularly when aligning and securing larger units. If working alone, consider installing smaller bays first to build confidence.
How do you make sure gondola shelving is level?
Use a spirit level on both the horizontal shelves and vertical uprights at multiple points during assembly. Check the frame is level before installing shelves, then verify each shelf individually. Adjust the feet or shims underneath the base if needed. Proper levelling ensures shelves don't sag and products display correctly, which is crucial for both appearance and safety.


