

Table of Contents
- What You'll Need Before You Start
- Sheffield Bike Stand Installation Depth and Foundation Size
- Step 1: Mark Out and Prepare the Ground
- Step 2: Dig, Set and Level the Stands
- Cycle Parking Spacing Requirements
- Step 3: Mix, Pour and Cure the Concrete
- Common Mistakes to Avoid
- Conclusion
- Frequently Asked Questions
Last Updated: September 14, 2026
What You'll Need Before You Start
Installing Sheffield bike stands in concrete is a straightforward job when the ground is prepared properly, and this guide from Store Fittings Direct walks through the full process from marking out to curing. A Sheffield stand is a tubular, inverted-U cycle rack that lets a bike be secured at the frame and both wheels, which is why national cycling associations recommend it over wheel-bending alternatives (Cycle Stands). Get the preparation right and the stands will stay solid and upright for years of daily use. Rush it, and you will be re-digging them within a season.
Before you break ground, gather everything you need so the concrete does not go off while you are still hunting for a trowel. The list below covers a single stand; multiply the materials for each additional stand in the run.
Tools for Installing Cycle Racks
The tools for installing cycle racks are simple and mostly already in a contractor's van. You need:
- Post hole digger or auger, plus a spade for trimming
- Tape measure, string line and marking paint
- Spirit level, at least 600 mm
- Wheelbarrow and mixing paddle or shovel
- Bucket for water and a hose
- Trowel and float
- Gloves, safety glasses and high-visibility clothing
- Timber offcuts and wedges for propping
For a larger run, hire a petrol auger. It cuts a clean hole in minutes and saves your back.
Choosing the Right Stand Material
Galvanised steel suits most outdoor installations because the zinc coating resists rust, and it is the cheaper option. Stainless steel costs more but holds its finish in coastal or heavily salted locations.

Store Fittings Direct stocks both: Sheffield Cycle Stands Galvanised at £48.41 and Sheffield Cycle Stands Stainless Steel at £93.43. If budget is tight, the Economy Sheffield Cycle Stands Galvanised come in at £49.75 and do the same job. All three ship with free delivery.


Sheffield Bike Stand Installation Depth and Foundation Size
Sheffield bike stand installation depth should be a minimum of 300 mm below ground for a standard stand, set into a concrete foundation at least 300 mm square (Sheffield stands, at home...). That gives enough mass to resist the use a locked bike applies when it is pushed or knocked.
Two variables change the figure. First, ground conditions: soft or previously disturbed soil needs a deeper, wider footing, often 400 mm. Second, stand height: taller or heavier-duty stands need more buried length to stay stable.
A practical rule is to bury roughly one third of the stand's total leg length. For a 900 mm above-ground stand, that means around 300 mm in the ground. Check the manufacturer's specification before you dig, because the required depth can vary between models.
Step 1: Mark Out and Prepare the Ground
Start by marking the exact position of each stand with paint or pegs, then run a string line to keep the whole row straight. A crooked row looks amateurish and makes bikes harder to park.
Check for buried services before you dig. Cable avoidance tools and service plans will tell you where water, gas, electricity and drainage run. Striking a cable is dangerous and expensive.
Clear the surface of turf, gravel or paving and set it aside if you plan to reinstate it. Then confirm your spacing before you commit to the holes, because moving a marked position after digging is wasted effort.
Step 2: Dig, Set and Level the Stands
Dig each hole to the depth you settled on, keeping the sides roughly vertical. A hole that tapers to a point at the bottom gives the concrete less to grip.
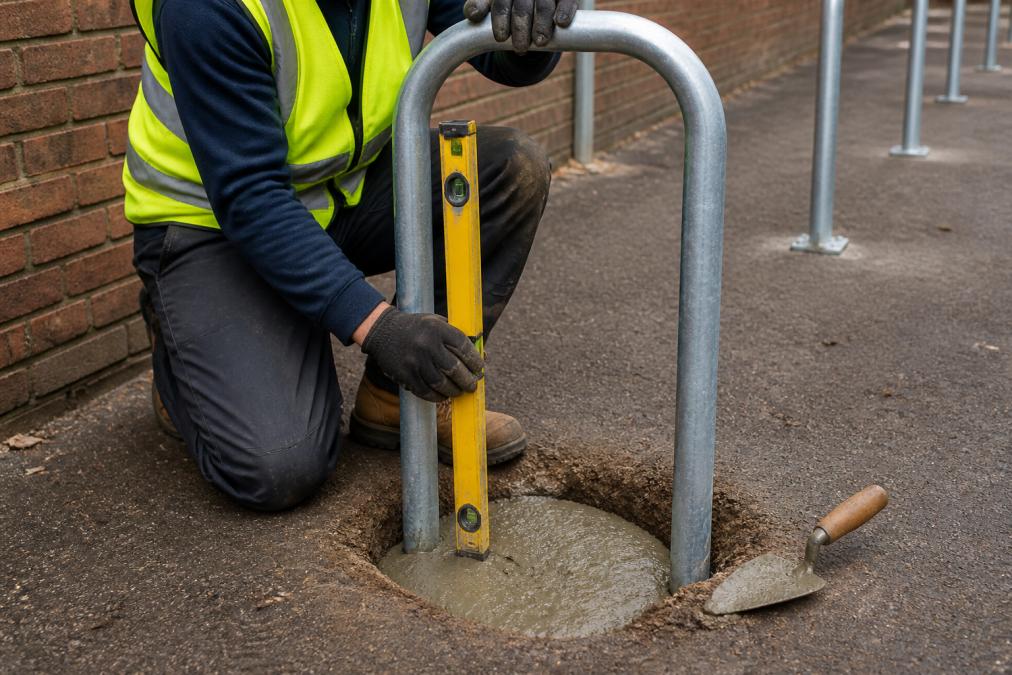
Lower the stand into the hole and check it is upright with the spirit level on two faces, not just one. A stand that reads level front-to-back can still lean sideways. Prop it with timber offcuts and wedges so it cannot shift while the concrete sets.
Set the top of the stand at the height you want before adding concrete. Once the mix is in, adjusting the height is messy and rarely accurate.
Cycle Parking Spacing Requirements
Cycle parking spacing requirements call for 600 mm between adjacent Sheffield stands, measured centre to centre, with 1,000 mm of clear space in front of each stand for manoeuvring a bike in and out (gov.uk).
Where stands are installed in a row against a wall, allow at least 2,000 mm from the wall to the front of the stand so a bike can be wheeled clear. For two-tier or angled layouts, spacing changes, so check the specific product guidance.
| Layout | Centre-to-centre spacing | Clear access space |
|---|---|---|
| Single row, freestanding | 600 mm | 1,000 mm both sides |
| Single row against a wall | 600 mm | 2,000 mm in front |
| Parallel rows, back to back | 600 mm | 2,000 mm between rows |
Getting this wrong is the difference between a rack that fills up and one that sits half empty because riders cannot get their bikes in.
Step 3: Mix, Pour and Cure the Concrete
Mix a concrete batch strong enough for a structural footing, typically a 1:2:4 cement, sand and aggregate mix, or use a ready-mixed postcrete for smaller jobs. Pour it into the hole around the stand, working it down with a piece of timber to remove air pockets.
Fill to just above ground level and slope the top slightly away from the stand so water runs off rather than pooling at the base. Tamp the surface and smooth it with a float. Recheck the stand is level while the concrete is still workable.
Leave the props in place and keep traffic away for at least 24 to 48 hours. Full cure takes longer, so avoid loading the stand with bikes for several days. In cold weather, cover the footing to protect it from frost.
Common Mistakes to Avoid
The most frequent error is digging holes that are too shallow, which lets the stand lean once a bike is locked to it. The second is failing to check level on both faces, leaving a rack that looks fine from the front and tilts from the side.
A third mistake is spacing stands too tightly. Riders cannot park without clashing handlebars, and the rack underperforms. Finally, do not pour concrete over a stand without propping it. The weight and vibration of the mix will shift an unpropped stand out of plumb before it sets.
Get these four right and the installation will outlast the bikes parked in it.
Conclusion
A Sheffield stand installation is only as good as its preparation: correct depth, level setting, sensible spacing and a proper cure. Miss any one of those and you will be back with a breaker bar sooner than you would like. Store Fittings Direct supplies galvanised and stainless steel Sheffield stands with free nationwide delivery, backed by over 30 years of experience and more than 1.3 million products sold. Browse the full cycle stand range and get the right rack for your site.
Frequently Asked Questions
What is the recommended depth for a Sheffield bike stand foundation?
For most Sheffield bike stands, a hole depth of 300mm to 400mm below ground level is sufficient for a secure fix in normal ground conditions. The hole diameter should be roughly three times the width of the stand's legs, so around 150mm to 200mm for standard tubular stands. In softer ground or areas with heavy use, increase the depth to 400mm. Always check the manufacturer's guidance for the specific stand you are installing.
Can Sheffield stands be installed on existing concrete or only new pours?
Both options work. You can core-drill through existing concrete slabs and resin-anchor the stand base, which suits paved areas that are already solid. Alternatively, you can break out sections of existing concrete, dig fresh post holes and re-pour around the legs. For new installations, pouring concrete directly around the stand legs gives the strongest and longest-lasting result, especially where the ground is uneven or the slab is thin.
How much space should be left between Sheffield bike stands?
Allow at least 800mm between the centres of adjacent stands when they are installed in a row, and leave 600mm of clear space in front of and behind each stand for bikes to be wheeled in and out. Getting the spacing right prevents handlebars clashing and makes the cycle parking area easier to use.
What type of concrete mix is best for setting bike stands?
A standard C20/25 concrete mix is suitable for most Sheffield bike stand installations. For small jobs, you can use a postcrete-style rapid-setting mix, which sets in around 10 to 15 minutes and saves mixing time. For larger installations or commercial sites, ready-mixed C25/30 concrete gives better long-term strength. Whichever mix you choose, make sure the concrete fully surrounds the stand legs and is tamped down to remove air pockets.


